Wednesday, February 27, 2013

Best option for a hybrid


I've seen many attempts at a hybrid 3D printer and CnC. This one is the best I've seen. It can cut, plasma cut, extrude and much much more. I've been watching this build since the beginning and it looks promising. I must admit I have not seen the cold and hot end but with a master designer like this I'm thinking I will be surprised. This is the best of the best. Estimated build costs reach about $4,000 which really wouldn't be a bad cost for just a quality CnC. This is definitely for the big boys. The estimated build cost does not include heated bed, extruded or mount. He is also selling some kits at cost to get the ball rolling on future development of the Platform. For further information check out the Platform CnC page. He also offers a basic MDF CnC plans for an earlier design. I also have further information that you can not find on his site. If you have further questions or build photo needs feel free to get a hold of me. Here's a link to the Platform page

Basic Stepper Wiring Guide

This is just a basic wiring guide for some stepper motors. Here is a link to a log for all those random stepper motors that have been found in random scraped electronics, printers and scanners. Click here

Stand Alone Printing Ideas

I am currently working on a stand alone or computer assisted control. I have a few options that I am currently looking into. One of them is to drastically slim down the computer size and the other option is similar to the rasberry PI with a pronterface like UI. I kinda like the stand alone option with everything tucked into a larger portable controller with mounted screen. Something that is easily transported and easily setup with any printer that is using Ramps. Some of the other options that I am pursuing are more workstation oriented. I'm sure that either way I go I will be satisfied. If not then I will continue with further redesign. I posted some pictures showing the options of the routes I may take. I currently have a 7" screen mounted to my Printrbot Nintendo ed. That is controlled through an old skool Nintendo controller. I will more than likely take down the 7" screen and mount it into a portable controller that is simply plugged into my current setup. Check back soon, I will update as I continue with the design.

Tuesday, February 26, 2013

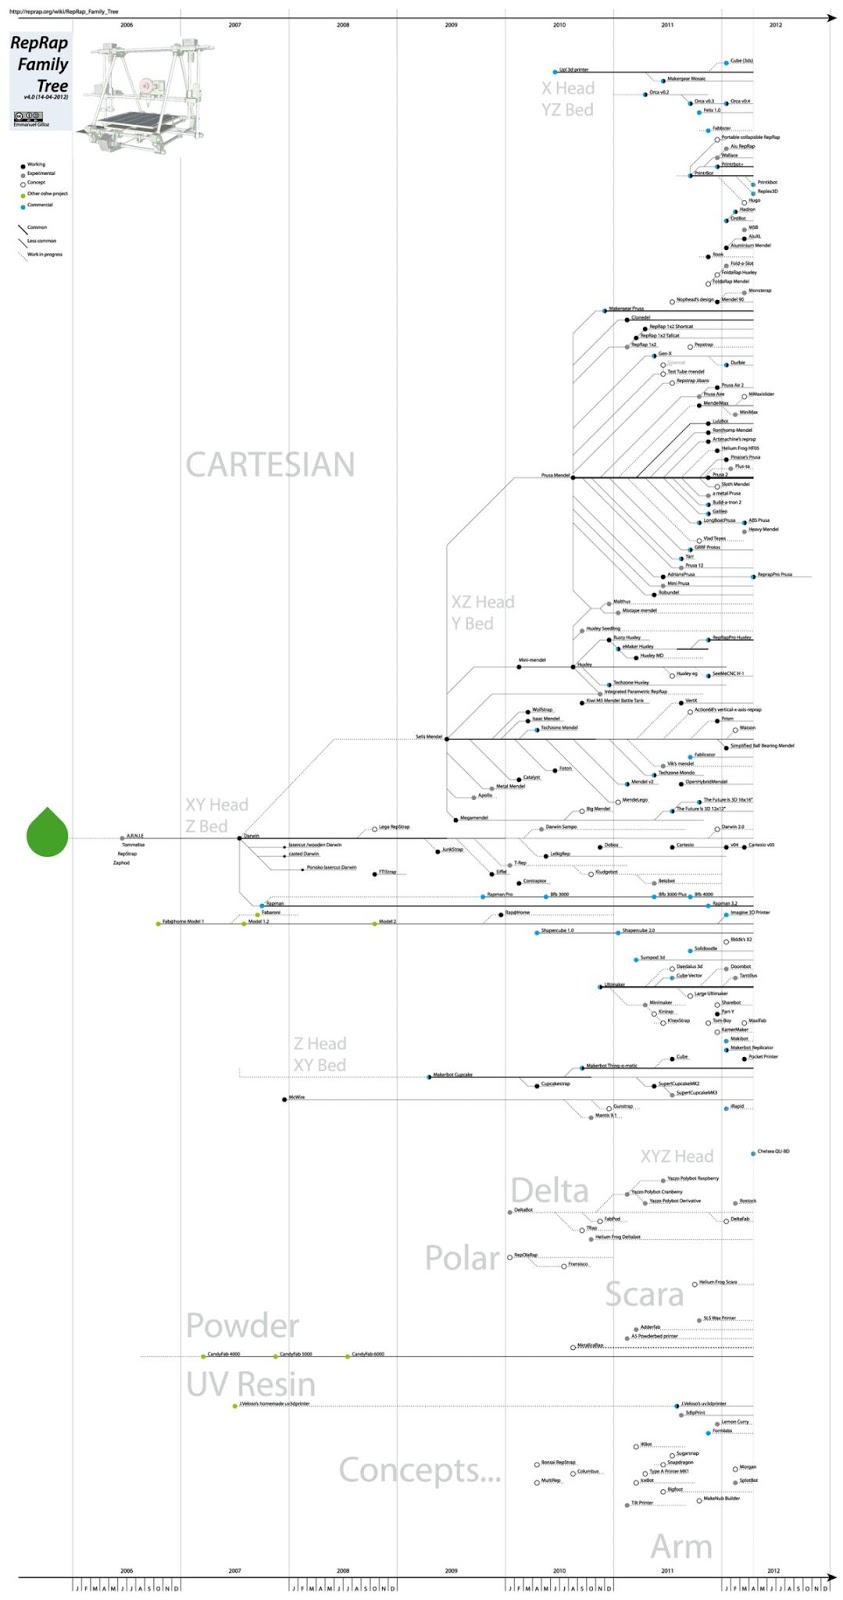
The RepRap Timeline

Here is a timeline of the RepRap machines. Its kinda cool to see the evolution of the industry.

Sunday, February 24, 2013

SLA Printing May Be The Future

Early desktop printers were horrible. For the price of thousands of dollars one got lo-res dot matrix printouts on paper that had tractor-feed holes punched into the margins. It wasn’t pretty, but those early models paved the way for high-resolution, low-cost laser printing.

Today’s hobby grade 3-D printers are similarly crude. They all use Fused Filament Fabrication (FFF) technology and are essentially robotic hot glue guns. Fortunately, a new generation of higher-resolution, faster, and more reliable machines are starting to come to market.

This new type of hobbyist printer use Stereolithography (SLA) technology, utilizing light instead of heat to make models. How? A high powered light source hardens a cross section of light-sensitive liquid plastic. The machine then raises the build platform a smidge and the process is repeated. It’s very dramatic — models look like they are being pulled from a puddle of goo.

This pioneering technology brings three much needed improvements to home based 3-D printers:

1. Higher Resolution Models, Built Quicker
Parts made on SLA systems are much higher resolution than prints from FFF machines which have bumpy, ridged surfaces. They aren’t quite as polished as injection molded parts, but are almost as good as professional grade mills.
Also, since the light hardens the plastic simultaneously, the only factor impacting print speed is the height of the object. With FFF printers, speed is determined by the amount of plastic needed to fill in a cross section, which can slow the process considerably.

2. More Complex Geometry is Possible. Trying to print complex shapes with severe undercuts or delicate features on a FFF machine would lead to nothing but pulled hair and wasted plastic. SLA opens up new, richer design possibilities.

3. Translucent Materials
Because of its capacity for high-resolution and the nature of the chemicals used in the process, SLA models can be translucent. They won’t be optically clear, so you won’t be printing yourself new specs any time soon, but the see-through look brings a new palette of options for designers.

Yes, There Are Downsides
SLA-based 3-D printers do have drawbacks. The biggest red flag is that no established companies are selling these kits yet. They’re being developed by enthusiasts (read: no dedicated customer service when you’re in desperate need of help).

Also, they’re expensive, retailing for $1,999 to $3,375. While that’s not too far a stretch from the top-of-the-line MakerBot, it’s vastly more than a $500 BuildrBot.
The ‘consumable’ resin is also more expensive. A few pounds of plastic for an FFF machine costs $50-80, but a similar amount of light-sensitive resin will cost $120+ dollars.

Early-adopter limitations aside, SLA based 3-D printers are much closer to the state-of-the-art in the professional market and will produce parts that have the polished look of mass manufacturing.
Ready to learn more? Than look up SLA 3D printers and see what's on the cutting edge.

Saturday, February 23, 2013

RepRap Squad's Next Project

RepRap Squad's 5 axis build

The next project We will be undertaking is a 5 axis 3D printer.  5 Axis you say? Yup 3 of the axis will be mounted to the z axis. This will give us the ability to print just about anything. Several years of research has gone into this project. A man only known as Rap has dedicated hundreds if not thousands of hours on this project alone.  We are only limited by our imaginations. At RepRap Squad we are always trying to push the limits of what is possible.  Innovation is the key to building the ultimate machine. I cant wait to get started.  If you have any ideas or input feel free to share. Once We have gotten together a workable model it will be all open source.  I will update this post with new research as well as a build log when We get started. My trip to Arizona is going great. Its good to see Rap and work on the new 5 Axis RepRap project. The work he is doing down here is amazing and I'm glad he's a part of RepRap Squad. He has the start of several working bots. A lot of his work history is on the design and implementation of 5 axis CNC's as well as extruded design. He is on the cutting edge of the new commercial machining. He also gave me some sketched up models he is basing his working models from. I will post all new information I have as soon as I am back in town.

Cnc power supply

This is a custom built power supply. The transformer that I put in my CnC. It offers 24 v and 12 v @ 31 amps on the 2ndary.  It's a custom built transformer that was originally used for high end stage intelligent lighting. On the primary side it offers U.S. and foreign input voltage. It offers, input and output fuse protection for both lines. It also has a mini fused power strip for a USB power splitter as well as any other wall plugable power needed . It has an internal fan and dual exhaust fans. In the front it has XLR  inputs for mechanical end stop switches. Of course it also offers led's as well as a spring loaded acrylic top that has solenoids to raise and lower the top. These are used for cooling.  The fans also adjust speed and rotation direction according to cooling needs. The solenoids and fans are ran through an Arduino sketch that I wrote.  All in all It's a great power supply for cnc but it might be too bulky for RepRap usages.